This article was originally published in PoC||GTFO issue 14.
At the end of last year (following their usual three-year cycle), Nintendo released a new generation of Pokémon games for their latest portable console, the Nintendo 3DS. This time, their new entry in the series spectacularly destroyed several sales records, becoming the most pre-ordered game in Nintendo’s history. And of course, along with a new Pokémon title, there are always several things that follow suit, such as a new season of the long running anime, a flood of cheapo toys, and datamining the latest games into oblivion. This article is not about the anime or the datamining; rather, it’s about one of the cheapo toys.
The two new games, Pokémon Sun and Pokémon Moon, focus on a series of four islands known as Alola in the middle of the ocean. Alola is totally not Hawaiʻi. (Yes it is.) The game opens with a cutscene of a mysterious girl holding a bag and running away from several other mysterious figures. Near the beginning of the game, the player character runs into this mystery girl, known as Lillie, as she runs up to a bridge, and a rare Pokémon named Nebby pops out of the bag and refuses to go back in. It shudders in fear on the bridge as it’s harried by a pack of birds—sorry, Flying type—Pokémon. The player character runs up to protect the Pokémon, but instead gets pecked at mercilessly.
Nebby responds by blowing up the bridge. The player and Nebby fall to their certain doom, only to be saved by the Guardian Pokémon of the island, Tapu Koko, who grabs them right before they hit the bottom of the ravine. Tapu Koko flies up to where Lillie is watching in awe, and delivers the pair along with an ugly stone that happens to have a well-defined Z shape on it. This sparkling stone is crafted by the kahuna of the island (Did I mention that we’re not in Hawaiʻi? I was lying.) into what is known as a Z-Ring. So obviously there’s a toy of this.
In the game, the Z-Ring is an ugly, bulky stone bracelet given to random 11-year old children. You shove sparkling Z-Crystals onto it, and it lets you activate special Z-Powers on your Pokémon, unlocking super-special-ultimate Z-Moves to devastate an opponent. In real life, the Z-Ring is an ugly, bulky plastic bracelet given to random 11-year old children. You shove plastic Z-Crystals onto it, and it plays super-compressed audio as lights flash, and the ring vibrates a bit. More importantly, when you activate a Z-Power in-game, it somehow signals the physical Z-Ring to play the associated sound, regardless of which cheap plastic polyhedron you have inserted into it at the time. How does it communicate? Some people speculated about whether the interface was Bluetooth LE or a custom wireless communication protocol, but I have not seen anyone else reverse it. I decided to dig in myself.
The toy is rather overpriced compared to its build quality, but, having seen one at a store recently, I decided to pick it up and take a look. After all, I’d done only minimal hardware reversing, and this seemed to be a good excuse to do more. The package included the Z-Ring bracelet, three Z-Crystals, and a little Pikachu toy. Trying to unbox it, I discovered that the packaging was horrendous. It’s difficult to remove all of the components without breaking anything. I feel sorry for all of the kids who got this for Christmas and then promptly broke off Pikachu’s tail as they eagerly tried to remove it from the plastic.
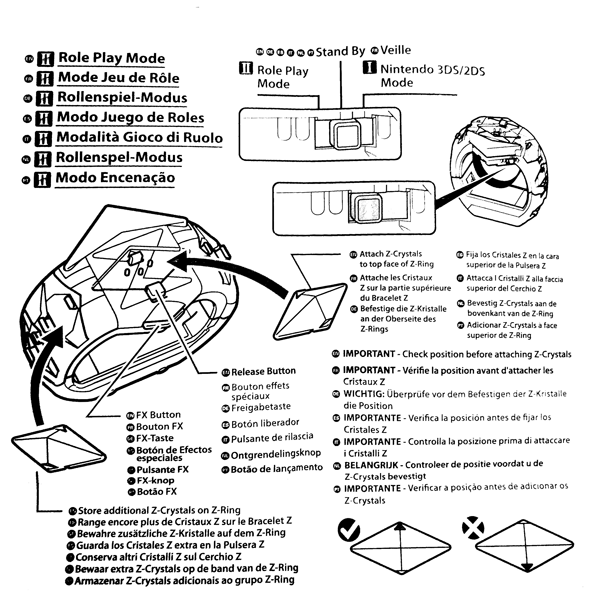
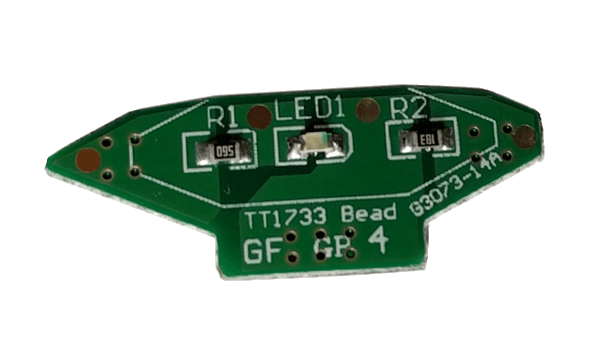
The bracelet itself has slots on the sides to hold six Z-Crystals and one on the top that has the signature giant Z around it. The slot on the top has three pogo pins, which connect to pads on a Z-Crystal. The center of these is GND, with one pin being used to light the LED through a series resistor (R1, 56Ω) and the other pin being used to sense an identity resistor (R2, 18kΩ for green).
It also has a tri-state switch on the side. One setting (Mode I) is for synchronizing to a 3DS, another (Mode II) is for role-play and synchronizes with six tracks on the Sun/Moon soundtrack, and the final (neutral) setting is the closest thing it has to an off mode. A button on the side will still light up the device in the neutral setting, presumably for store demo reasons.
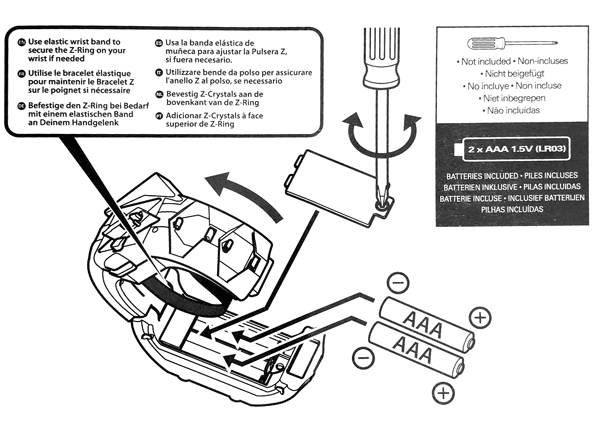
My first step in trying to reverse engineer the device was figuring out how to pair it with my 3DS. Having beaten my copy of Pokémon Sun already, I presumably had obtained anything needed in-game to pair with the device, but there was no explicit mention of the toy in-game. Included in the toy’s packaging were two tiny pamphlets, one of which was an instruction manual. However, the instruction manual was extremely minimal and mostly just described how to use the toy on its own. The only thing I could find about the 3DS interface was an instruction to turn up the 3DS volume and set the audio to stereo. There was also a little icon of headphones with a line through them. I realized that it didn’t pair with the 3DS at all. It was sound-triggered!
I pulled out my 3DS, loaded up the game, and tried using a Z-Power in-game with the associated Z-Crystal inserted into the top of the toy. Sure enough, with the sound all the way up, the Z-Ring activated and synchronized with what the game was doing.
Now that I knew I’d need to record audio from the game, I pulled up Audacity on my laptop and started recording game audio from the speakers. Expecting the audio to be in ultrasonic range, I cranked up the sample rate to 96kHz (although whether or not my laptop microphone can actually detect sound above 22kHz is questionable) and stared at it in Audacity’s spectrogram mode. Although I saw a few splotches at the top of the audible range, playing them back did not trigger the Z-Ring at all. However, playing back the whole recording did. I tried playing subsets of the sample until I found portions that triggered the Z-Ring. As I kept cropping the audio shorter and shorter, I finally found what I was looking for. The trigger wasn’t ultrasonic. It was in fact completely audible.
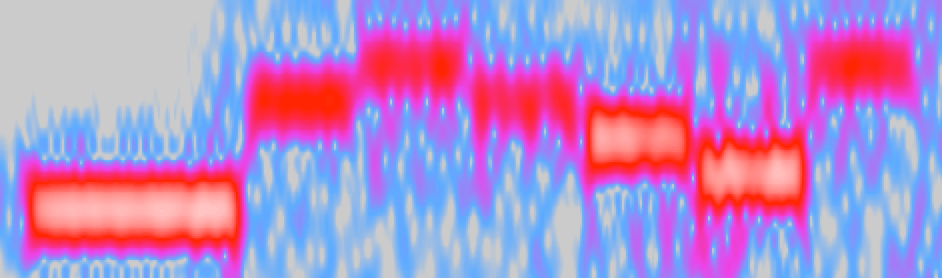
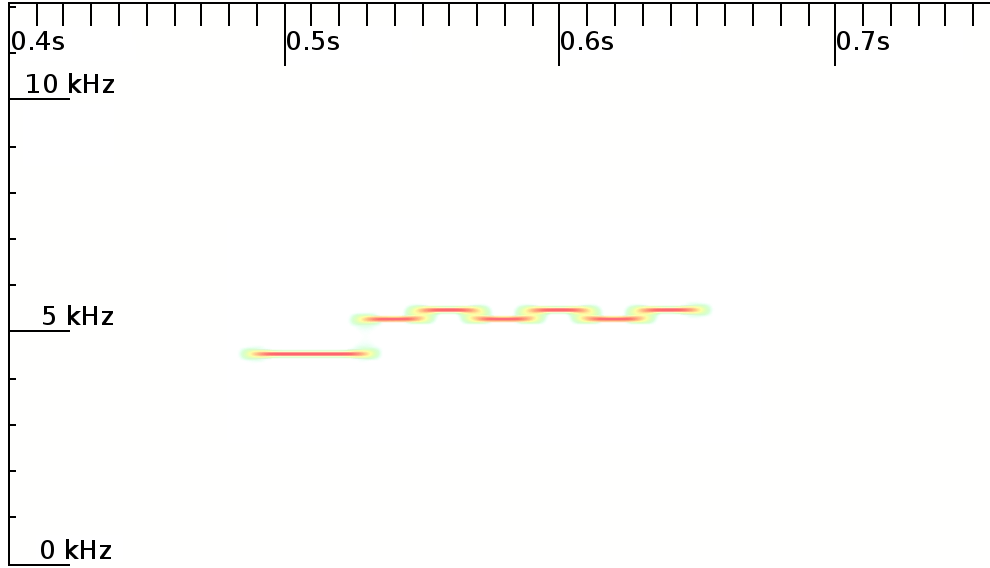
When you activate a Z-Power in the game, a short little jingle always plays. I had previously assumed that the jingle was just for flavor, but when I looked at it, there were several distinctive lines on the spectrogram. The very beginning of the jingle included seven different tones, so I tried playing back that section. Sure enough, the Z-Ring activated. I cropped it down to the first four tones, and the Z-Ring would reliably activate and play a specific sample whenever I played the audio back. Rearranging the tones, I got it to play back a different sample. That was how to signal the toy, but now the task was finding all of the samples stored on the Z-Ring without dumping the ROM.
Looking at the recording in the spectrogram, it was pretty clear that the first tone, which lasts all of 40 milliseconds and is a few hundred hertz lower than the rest of the signal, is a marker indicating that the next few tones describe which sample to play back. I quickly reconstructed the four tones as just sine waves in Audacity to test my hypothesis, and sure enough, I was able to trigger the tones using the constructed signal as well. However, that was a tedious process and did not lend itself to being able to explore and document all of the tone combinations. I knew I needed to write some software to help me quickly change the tones, so I could document all the combinations. Since it looked as if the signal was various combinations of approximately four different frequencies, it would take some exploration to get everything.
I’m lazy and didn’t feel like writing a tone generator and hooking it up to an audio output device and going through all of the steps I’d need to get sine waves of programmatically-defined frequencies to come out of my computer. However, I’m a special kind of lazy, and I really appreciate irony. The game is for the 3DS, right? What system is Pokémon famous for originating on? The original Game Boy, a platform with hardware for generating audible tones! Whereas the 3DS also has a microphone, the audio communication is only used in one direction. Perfect!
Now, I’d never written a program for the Game Boy, but I had implemented a Game Boy emulator. Fixing bugs on an emulator requires debugging both the emulator and the emulated software at the same time, so I’m quite familiar with the Game Boy’s unique variant of Z80, making the barrier of entry significantly lower than I thought it would be. I installed Rednex Game Boy Development System, one of the two most popular toolchains for compiling Game Boy homebrew ROMs, and wrote a few hundred lines of assembly. I figured the Game Boy’s audio channel 3, which uses 32-sample wavetables of four-bit audio, would be my best chance to approximate a sine wave. After a bit of experimenting, I managed to get it to create the right tones. But the first obstacle to playing back these tones properly was the timing. The first tone plays for 40 milliseconds, and the remaining tones each last 20 milliseconds. A frame on the GB is roughly 16 milliseconds long, so I couldn’t synchronize on frame boundaries, yet I found a busy loop to be impractical. (Yes, GB games often use busy loops for timing-sensitive operations.) Fortunately, the GB has a built-in timer that can fire an interrupt after a given number of cycles, so, after a bit of math, I managed to get the timing right. Success! I could play back a series of tones from a table in RAM with the right timing and the right frequencies.
Sure enough, when I played this back in an emulator, the Z-Ring activated! The ROM plays the tones upon boot and had no user interface for configuring which tones to play, but recompiling the ROM was fast enough that it wasn’t really an issue.
The natural next step was uploading the program to a real Game Boy. I quickly installed the program onto a flash cart that I had purchased while developing the emulator. I booted up my original Game Boy, the tones played, and… the Z-Ring did not activate. No matter how many times I restarted the program, the tones would not activate the Z-Ring. I recorded the audio it was playing, and the tones were right. I was utterly confused until I looked a bit closer at the recording: the signal was getting quieter with every subsequent tone. I thought that this must be a bug in the hardware, as the Game Boy’s audio hardware is notorious for having different quirks between models and even CPU revisions. I tried turning off the audio channel and turning it back on again a few cycles later to see if that fixed anything. It still worked in the emulator, so I put it back on the flash cart, and this time it worked! I could consistently trigger one of the samples I’d seen, but some of the other ones seemed to randomly select one of three tones to play. Something wasn’t quite right with my tone generation, so I decided to halve the sample period, which would give me more leeway to finely adjust the frequency. This didn’t appear to help at all, unfortunately. Scoping out all of the combinations of the tones I thought were in range yielded about 30 responses out of the 64 combinations I tried. Unfortunately, many of the responses appeared to be the same, and many of them weren’t consistent. Additionally, samples I knew the Z-Ring had were not triggered by any of these combinations. Clearly something was wrong.
I needed a source of several unique known-good signals, so I scoured YouTube and found an “All Z-Moves” video. Sure enough, it triggered from the Z-Ring a bunch of reactions I hadn’t seen yet. Taking a closer look, I saw that the signal was actually all seven tones (not four), so extending the program to use seven tones suddenly yielded much more consistent results. Great! The bad news was that beyond the first, fixed tone, there were four variations of each subsequent tone, leading to a total of 46 combinations. That’s 4,096. That’s a lot to scope out. I decided to take another route and catalog every signal in the video as a known pattern. I could try other signals later. Slowly, I went through the video and found every trigger. It seemed that there were two separate commands per move: one was for the initial half of the scene, where the Pokémon is “surrounded by Z-Power,” and then the actual Z-Move was a separate signal. Unfortunately, three of the former signals had been unintentionally cropped from the video, leaving me with holes in my data. Sitting back and looking at the data, I started noticing patterns. I had numbered each tone from 0 (the lowest) to 3 (the highest), and every single one of the first 15 signals (one for each of the 18 Pokémon types in-game, minus the three missing types) ended with a 3. Some of the latter 18 (the associated Z-Powers per type) ended with a 1, but most ended with a 3. I wasn’t quite sure what that meant until I saw that other tones were either a 0 or a 2, and the remainder were either a 1 or a 3. Each tone encoded only one bit, and they were staggered to make sure the adjacent bits were differentiable!
This reduced the number of possibilities from over four thousand to a more manageable sixty-four. It also lent itself to an easy sorting technique, with the last bit being MSB and the first being LSB. As I sorted the data, I noticed that the first 18 fell neatly into the in-game type ordering, leaving three holes for the missing types, and the next 18 all sorted identically. This let me fill in the holes and left me with 36 of the 64 combinations already filled in. I also found 11 special, Pokémon-specific (instead of type-specific) Z-Moves, giving me 47 total signals and 17 holes left. As I explored the remaining holes, I found five audio samples of Pikachu saying different things, and the other 12 didn’t correspond to anything I recognized.
In the process, I added a basic user interface to the Game Boy program that lets you either select from the presets or set the tones manually. Given the naming scheme of these Z-Crystals (for any given type or Pokémon, it would basically just be Typium-Z, e.g. Fire becomes Firium-Z), I naturally decided to name it Phreakium-Z.
I thought I had found all of the Z-Ring’s sound triggers, but it was pointed out to me while I was preparing to publish my results that the official soundtrack release had six “Z-Ring Synchronized” tracks that interfaced with the Z-Ring. I had already purchased the soundtrack, so I took a look and tried playing back the tracks with the Z-Ring nearby. Nothing happened. More importantly, the distinctive jingle of the 5kHz tones was completely absent from the tracks. So what was I missing? I tried switching it from Mode I into Mode II, and the Z-Ring lit up, perfectly synchronizing with the music. But where were the triggers? There was nothing visible in the 4–6kHz range this time around. Although I could clip portions of tracks down to specific triggers, I couldn’t see anything in the spectrogram until I expanded the visible range all the way up to 20kHz. This time the triggers were indeed ultrasonic or very nearly so.
Human hearing caps out at approximately 20kHz, but most adults can only hear up to about 15kHz. The sample rates of sound devices are typically no greater than 48kHz, allowing the production of frequencies up to 24kHz, including only a narrow band of ultrasonic frequencies. Given the generally poor quality of speakers at extremely high frequencies, you can imagine my surprise when I saw a very clear signal at around 19kHz.
Zooming in, I saw the distinctive pattern of a lower, longer initial tone followed by several staggered data tones. However, this time it was a 9-bit signal, with a 60ms initial tone at exactly 18.5kHz and a 20ms gap between the bits. Unfortunately, 18kHz is well above the point at which I can get any fine adjustments in the Game Boy’s audio output, so I needed to shift gears and actually write something for the computer. At first I wrote something quick in Rust, but this proved to be a bit tedious. I realized I could make something quite a bit more portable: a JavaScript web interface using WebAudio.
After narrowing down the exact frequencies used in the tones and debugging the JavaScript (as it turns out, I’ve gotten quite rusty), I whipped up a quick interface that I could use to explore commands. After all, 512 commands is quite a bit more than the 64 from Mode I.
Despite being a larger number of combinations, 512 was still a reasonable number to explore in a few hours. After I got the WebAudio version working consistently, I added the ability to take a number from 0 to 511 and output the correspondingly indexed tone, and I began documenting the individual responses generated. At first I was getting oddly erratic sequences, until I realized that I was parsing a base 10 number as a base 16 index. With that fixed, everything fell into place. I noticed that the first 64 indices of the 512 were in fact identical to the 64 Mode I tones, so that was quick to document. Once I got past the initial 64, I noticed that the responses from the Z-Ring no longer corresponded to game actions but were instead more granular single actions. For example, instead of a sequence of vibrations and light colors that corresponded to the animation of a Z-Move in game, a response included only one sound effect coupled with one lighting effect or one lighting effect with one vibration effect. There was also a series of sound effects that did not appear in Mode I and that seemed to be linked to individual Pokémon types. Many of the responses seemed randomly ordered, almost as though the developers had added the commands ad hoc without realizing that ordering similar responses would be sensible. Huge swaths of the command set ended up being the Cartesian product of a light color with a vibration effect. This ended up being enough of the command set that I was able to document the remainder of the commands within only a handful of hours.
Most of the individual commands weren’t interesting, but I did find eight additional Pikachu voice samples and a rather interesting command that — when played two or three times in a row — kicked the Z-Ring into what appeared to be a diagnostic mode. It performed a series of vibrations followed by a series of tones unique to this response, after which the Z-Ring stopped responding to commands. After a few seconds, the light on the bottom, which is completely undocumented in the manual and had not illuminated before, started blinking, and the light on top turned red. However, it still didn’t respond to any commands. Eventually I discovered that switching it to the neutral mode would change the light to blue for a few seconds, and then the toy would revert to a usable state. I’m still unsure of whether this was a diagnostic mode, a program upload mode, or something completely different.
By this point I’d put in several hours over a few days into figuring out every nook and cranny of this device. Having become bored with it, I decided to bite the bullet and disassemble the hardware. I found inside a speaker, a microphone, a motor with a lopsided weight for generating the vibrations, and a PCB. The PCB, although rather densely populated, did not contain many interesting components other than an epoxy blob labeled U1, an MX25L8006E flash chip labeled U2, and some test points. A dump of this flash ROM is available. At this point, I decided to call it a week and put the Z-Ring back together; it was just a novelty, after all.
These are the 512 commands of the Z-Ring.
- 000: Normalium-Z
- 001: Firium-Z
- 002: Waterium-Z
- 003: Grassium-Z
- 004: Electrium-Z
- 005: Icium-Z
- 006: Fightium-Z
- 007: Poisonium-Z
- 008: Groundium-Z
- 009: Flyium-Z
- 00A: Psychium-Z
- 00B: Buginium-Z
- 00C: Rockium-Z
- 00D: Ghostium-Z
- 00E: Dragonium-Z
- 00F: Darkium-Z
- 010: Steelium-Z
- 011: Fairium-Z
- 012: Breakneck Blitz
- 013: Inferno Overdrive
- 014: Hydro Vortex
- 015: Bloom Doom
- 016: Gigavolt Havoc
- 017: Subzero Slammer
- 018: All-Out Pummeling
- 019: Acid Downpour
- 01A: Tectonic Rage
- 01B: Supersonic Skystrike
- 01C: Shattered Psyche
- 01D: Savage Spin-Out
- 01E: Continental Crush
- 01F: Never-Ending Nightmare
- 020: Devastating Drake
- 021: Black Hole Eclipse
- 022: Corkscrew Crash
- 023: Twinkle Tackle
- 024: Sinister Arrow Raid (Decidium-Z)
- 025: Malicious Moonsault (Incinium-Z)
- 026: Oceanic Operetta (Primarium-Z)
- 027: Catastropika (Pikachunium-Z)
- 028: Guardian of Alola (Tapunium-Z)
- 029: Stoked Sparksurfer (Aloraichium-Z)
- 02A: Pulverizing Pancake (Snorlium-Z)
- 02B: Extreme Evoboost (Eevium-Z)
- 02C: Genesis Supernova (Mewium-Z)
- 02D: Soul-Stealing 7-Star Strike (Marshadium-Z)
- 02E: (unknown)
- 02F: (unknown)
- 030: 10,000,000 Volt Thunderbolt (Pikashunium-Z)
- 031: (unknown)
- 032: (unknown)
- 033: (unknown)
- 034: (unknown)
- 035: (unknown)
- 036: (unknown)
- 037: (unknown)
- 038: (unknown)
- 039: Pikachu 1
- 03A: Pikachu 2
- 03B: Pikachu 3
- 03C: Pikachu 4
- 03D: Pikachu 5
- 03E: (unknown)
- 03F: (no response)
- 040: SFX/Light (Normal)
- 041: SFX/Light (Fire)
- 042: SFX/Light (Water)
- 043: SFX/Light (Grass)
- 044: SFX/Light (Electric)
- 045: SFX/Light (Ice)
- 046: SFX/Light (Fighting)
- 047: SFX/Light (Poison)
- 048: SFX/Light (Ground)
- 049: SFX/Light (Flying)
- 04A: SFX/Light (Psychic)
- 04B: SFX/Light (Bug)
- 04C: SFX/Light (Rock)
- 04D: SFX/Light (Ghost)
- 04E: SFX/Light (Dragon)
- 04F: SFX/Light (Dark)
- 050: SFX/Light (Steel)
- 051: SFX/Light (Fairy)
- 052: (no response)
- 053: Vibration (soft, short)
- 054: Vibration (soft, medium)
- 055: Vibration (pattern 1)
- 056: Vibration (pattern 2)
- 057: Vibration (pattern 3)
- 058: Vibration (pattern 4)
- 059: Vibration (pattern 5)
- 05A: Vibration (pattern 6)
- 05B: Vibration (pattern 7)
- 05C: Vibration (pattern 8)
- 05D: Vibration (pattern 8)
- 05E: Vibration (pattern 9)
- 05F: Vibration (pattern 10)
- 060: Vibration (pattern 11)
- 061: Vibration (pattern 12)
- 062: Vibration (pattern 13)
- 063: Vibration (pattern 14)
- 064: Light (yellow)
- 065: Light (pale blue)
- 066: Light (white)
- 067: Light (pattern 1)
- 068: Light (pattern 2)
- 069: Vibration (pattern 15)
- 06A: Vibration (pattern 16)
- 06B: Light/Vibration (red, very short)
- 06C: Light/Vibration (red, short)
- 06D: Light/Vibration (red, medium)
- 06E: Light (red)
- 06F: Light (yellow/green)
- 070: Light (green)
- 071: Light (blue)
- 072: Light (purple)
- 073: Light (pale purple)
- 074: Light (magenta)
- 075: Light (pale green)
- 076: Light (cyan)
- 077: Light (pale blue/purple)
- 078: Light (gray)
- 079: Light (pattern purple, pale purple)
- 07A: Light/Vibration (pale yellow, short)
- 07B: Light/Vibration (pale yellow, short)
- 07C: (no response)
- 07D: (no response)
- 07E: Self test/program mode? (reboots afterwards)
- 07F: Light (pale yellow)
- 080: Light (pale blue)
- 081: Light (pale magenta)
- 082: SFX/Vibration (Normal)
- 083: SFX/Vibration (Fire)
- 084: SFX/Vibration (Water)
- 085: SFX/Vibration (Grass)
- 086: SFX/Vibration (Electric)
- 087: SFX/Vibration (Ice)
- 088: SFX/Vibration (Fighting)
- 089: SFX/Vibration (Poison)
- 08A: SFX/Vibration (Ground)
- 08B: SFX/Vibration (Flying)
- 08C: SFX/Vibration (Psychic)
- 08D: SFX/Vibration (Bug)
- 08E: SFX/Vibration (Rock)
- 08F: SFX/Vibration (Ghost)
- 090: SFX/Vibration (Dragon)
- 091: SFX/Vibration (Dark)
- 092: SFX/Vibration (Steel)
- 093: SFX/Vibration (Fairy)
- 094: Pikachu 1
- 095: Pikachu 2
- 096: Pikachu 3
- 097: Pikachu 4
- 098: Pikachu 5
- 099: Vibration (speed 1, hard, 2x)
- 09A: Vibration (speed 1, hard, 4x)
- 09B: Vibration (speed 1, hard, 8x)
- 09C: Vibration (speed 1, hard, 16x)
- 09D: Vibration (speed 1, pattern, 2x)
- 09E: Vibration (speed 1, pattern, 4x)
- 09F: Vibration (speed 1, pattern, 8x)
- 0A0: Vibration (speed 1, pattern, 16x)
- 0A1: Vibration (speed 2, hard, 2x)
- 0A2: Vibration (speed 2, hard, 4x)
- 0A3: Vibration (speed 2, hard, 8x)
- 0A4: Vibration (speed 2, hard, 16x)
- 0A5: Vibration (speed 2, pattern, 2x)
- 0A6: Vibration (speed 2, pattern, 4x)
- 0A7: Vibration (speed 2, pattern, 8x)
- 0A8: Vibration (speed 2, pattern, 16x)
- 0A9: Vibration (speed 3, hard, 2x)
- 0AA: Vibration (speed 3, hard, 4x)
- 0AB: Vibration (speed 3, hard, 8x)
- 0AC: Vibration (speed 3, hard, 16x)
- 0AD: Vibration (speed 3, pattern, 2x)
- 0AE: Vibration (speed 3, pattern, 4x)
- 0AF: Vibration (speed 3, pattern, 8x)
- 0B0: Vibration (speed 3, pattern, 16x)
- 0B1: Vibration (speed 4, hard, 2x)
- 0B2: Vibration (speed 4, hard, 4x)
- 0B3: Vibration (speed 4, hard, 8x)
- 0B4: Vibration (speed 4, hard, 16x)
- 0B5: Vibration (speed 4, pattern, 2x)
- 0B6: Vibration (speed 4, pattern, 4x)
- 0B7: Vibration (speed 4, pattern, 8x)
- 0B8: Vibration (speed 4, pattern, 16x)
- 0B9: Vibration (speed 5, hard, 2x)
- 0BA: Vibration (speed 5, hard, 4x)
- 0BB: Vibration (speed 5, hard, 8x)
- 0BC: Vibration (speed 5, hard, 16x)
- 0BD: Vibration (speed 5, pattern, 2x)
- 0BE: Vibration (speed 5, pattern, 4x)
- 0BF: Vibration (speed 5, pattern, 8x)
- 0C0: Vibration (speed 6, hard, 16x)
- 0C1: Vibration (speed 6, hard, 2x)
- 0C2: Vibration (speed 6, hard, 4x)
- 0C3: Vibration (speed 6, hard, 8x)
- 0C4: Vibration (speed 6, hard, 16x)
- 0C5: Vibration (speed 6, pattern, 2x)
- 0C6: Vibration (speed 6, pattern, 4x)
- 0C7: Vibration (speed 6, pattern, 8x)
- 0C8: Vibration (speed 6, pattern, 16x)
- 0C9: Vibration (speed 7, hard, 2x)
- 0CA: Vibration (speed 7, hard, 4x)
- 0CB: Vibration (speed 7, hard, 8x)
- 0CC: Vibration (speed 7, hard, 16x)
- 0CD: Vibration (speed 7, pattern, 2x)
- 0CE: Vibration (speed 7, pattern, 4x)
- 0CF: Vibration (speed 7, pattern, 8x)
- 0D0: Vibration (speed 7, pattern, 16x)
- 0D1: Vibration (speed 8, hard, 2x)
- 0D2: Vibration (speed 8, hard, 4x)
- 0D3: Vibration (speed 8, hard, 8x)
- 0D4: Vibration (speed 8, hard, 16x)
- 0D5: Vibration (speed 8, pattern, 2x)
- 0D6: Vibration (speed 8, pattern, 4x)
- 0D7: Vibration (speed 8, pattern, 8x)
- 0D8: Vibration (speed 8, pattern, 16x)
- 0D9: Vibration (speed 9, hard, 2x)
- 0DA: Vibration (speed 9, hard, 4x)
- 0DB: Vibration (speed 9, hard, 8x)
- 0DC: Vibration (speed 9, hard, 16x)
- 0DD: Vibration (speed 9, pattern, 2x)
- 0DE: Vibration (speed 9, pattern, 4x)
- 0DF: Vibration (speed 9, pattern, 8x)
- 0E0: Vibration (speed 9, pattern, 16x)
- 0E1: Vibration (speed 10, hard, 2x)
- 0E2: Vibration (speed 10, hard, 4x)
- 0E3: Vibration (speed 10, hard, 8x)
- 0E4: Vibration (speed 10, hard, 16x)
- 0E5: Vibration (speed 10, pattern, 2x)
- 0E6: Vibration (speed 10, pattern, 4x)
- 0E7: Vibration (speed 10, pattern, 8x)
- 0E8: Vibration (speed 10, pattern, 16x)
- 0E9: Vibration (speed 11, hard, 2x)
- 0EA: Vibration (speed 11, hard, 4x)
- 0EB: Vibration (speed 11, hard, 8x)
- 0EC: Vibration (speed 11, hard, 16x)
- 0ED: Vibration (speed 11, pattern, 2x)
- 0EE: Vibration (speed 11, pattern, 4x)
- 0EF: Vibration (speed 11, pattern, 8x)
- 0F0: Vibration (speed 11, pattern, 16x)
- 0F1: Vibration (speed 12, hard, 2x)
- 0F2: Vibration (speed 12, hard, 4x)
- 0F3: Vibration (speed 12, hard, 8x)
- 0F4: Vibration (speed 12, hard, 16x)
- 0F5: Vibration (speed 12, pattern, 2x)
- 0F6: Vibration (speed 12, pattern, 4x)
- 0F7: Vibration (speed 12, pattern, 8x)
- 0F8: Vibration (speed 12, pattern, 16x)
- 0F9: Vibration (speed 13, hard, 2x)
- 0FA: Vibration (speed 13, hard, 4x)
- 0FB: Vibration (speed 13, hard, 8x)
- 0FC: Vibration (speed 13, hard, 16x)
- 0FD: Vibration (speed 13, pattern, 2x)
- 0FE: Vibration (speed 13, pattern, 4x)
- 0FF: Vibration (speed 13, pattern, 8x)
- 100: Vibration (speed 13, pattern, 16x)
- 101: Vibration (speed 14, hard, 2x)
- 102: Vibration (speed 14, hard, 4x)
- 103: Vibration (speed 14, hard, 8x)
- 104: Vibration (speed 14, hard, 16x)
- 105: Vibration (speed 14, pattern, 2x)
- 106: Vibration (speed 14, pattern, 4x)
- 107: Vibration (speed 14, pattern, 8x)
- 108: Vibration (speed 14, pattern, 16x)
- 109: Vibration (speed 15, hard, 2x)
- 10A: Vibration (speed 15, hard, 4x)
- 10B: Vibration (speed 15, hard, 8x)
- 10C: Vibration (speed 15, hard, 16x)
- 10D: Vibration (speed 15, pattern, 2x)
- 10E: Vibration (speed 15, pattern, 4x)
- 10F: Vibration (speed 15, pattern, 8x)
- 110: Vibration (speed 15, pattern, 16x)
- 111: Vibration (speed 16, hard, 2x)
- 112: Vibration (speed 16, hard, 4x)
- 113: Vibration (speed 16, hard, 8x)
- 114: Vibration (speed 16, hard, 16x)
- 115: Vibration (speed 16, pattern, 2x)
- 116: Vibration (speed 16, pattern, 4x)
- 117: Vibration (speed 16, pattern, 8x)
- 118: Vibration (speed 16, pattern, 16x)
- 119: Vibration (speed 17, hard, 2x)
- 11A: Vibration (speed 17, hard, 4x)
- 11B: Vibration (speed 17, hard, 8x)
- 11C: Vibration (speed 17, hard, 16x)
- 11D: Vibration (speed 17, pattern, 2x)
- 11E: Vibration (speed 17, pattern, 4x)
- 11F: Vibration (speed 17, pattern, 8x)
- 120: Vibration (speed 17, pattern, 16x)
- 121: Vibration (speed 18, hard, 2x)
- 122: Vibration (speed 18, hard, 4x)
- 123: Vibration (speed 18, hard, 8x)
- 124: Vibration (speed 18, hard, 16x)
- 125: Vibration (speed 18, pattern, 2x)
- 126: Vibration (speed 18, pattern, 4x)
- 127: Vibration (speed 18, pattern, 8x)
- 128: Vibration (speed 18, pattern, 16x)
- 129: Vibration (speed 19, hard, 2x)
- 12A: Vibration (speed 19, hard, 4x)
- 12B: Vibration (speed 19, hard, 8x)
- 12C: Vibration (speed 19, hard, 16x)
- 12D: Vibration (speed 19, pattern, 2x)
- 12E: Vibration (speed 19, pattern, 4x)
- 12F: Vibration (speed 19, pattern, 8x)
- 130: Vibration (speed 19, pattern, 16x)
- 131: Vibration (speed 20, hard, 2x)
- 132: Vibration (speed 20, hard, 4x)
- 133: Vibration (speed 20, hard, 8x)
- 134: Vibration (speed 20, hard, 16x)
- 135: Vibration (speed 20, pattern, 2x)
- 136: Vibration (speed 20, pattern, 4x)
- 137: Vibration (speed 20, pattern, 8x)
- 138: Vibration (speed 20, pattern, 16x)
- 139: Vibration (speed 21, hard, 2x)
- 13A: Vibration (speed 21, hard, 4x)
- 13B: Vibration (speed 21, hard, 8x)
- 13C: Vibration (speed 21, hard, 16x)
- 13D: Vibration (speed 21, pattern, 2x)
- 13E: Vibration (speed 21, pattern, 4x)
- 13F: Vibration (speed 21, pattern, 8x)
- 140: Vibration (speed 21, pattern, 16x)
- 141: Vibration (speed 22, hard, 2x)
- 142: Vibration (speed 22, hard, 4x)
- 143: Vibration (speed 22, hard, 8x)
- 144: Vibration (speed 22, hard, 16x)
- 145: Vibration (speed 22, pattern, 2x)
- 146: Vibration (speed 22, pattern, 4x)
- 147: Vibration (speed 22, pattern, 8x)
- 148: Vibration (speed 22, pattern, 16x)
- 149: Vibration (soft, very long)
- 14A: Pikachu 6
- 14B: Pikachu 7
- 14C: Pikachu 8
- 14D: Pikachu 9
- 14E: Pikachu 10
- 14F: Pikachu 11
- 150: Pikachu 12
- 151: Light/Vibration (red, pattern 1)
- 152: Light/Vibration (red, pattern 2)
- 153: Light/Vibration (red, pattern 3)
- 154: Light/Vibration (red, pattern 4)
- 155: Light/Vibration (red, pattern 5)
- 156: Light/Vibration (red, pattern 6)
- 157: Light/Vibration (red, pattern 7)
- 158: Light/Vibration (red, pattern 8)
- 159: Light/Vibration (red, pattern 9)
- 15A: Light/Vibration (red, pattern 10)
- 15B: Light/Vibration (red, pattern 11)
- 15C: Light/Vibration (red, pattern 12)
- 15D: Light/Vibration (red, pattern 13)
- 15E: Light/Vibration (red, pattern 14)
- 15F: Light/Vibration (red, pattern 15)
- 160: Light/Vibration (red, pattern 16)
- 161: Light/Vibration (red, pattern 17)
- 162: Pikachu 13
- 163: Light (pale magenta)
- 164: Vibration (pattern 15)
- 165: Light/Vibration (pattern)
- 166: Light (pale yellow/green)
- 167: Light (pale blue/purple)
- 168: Light (magenta)
- 169: Light (yellow/green)
- 16A: Light (cyan)
- 16B: Light (pale blue)
- 16C: Light (very pale blue)
- 16D: Light (pale magenta)
- 16E: Light (pale yellow)
- 16F: Light/Vibration (blue, pattern 1)
- 170: Light/Vibration (blue, pattern 2)
- 171: Light/Vibration (blue, pattern 3)
- 172: Light/Vibration (blue, pattern 4)
- 173: Light/Vibration (blue, pattern 5)
- 174: Light/Vibration (blue, pattern 6)
- 175: Light/Vibration (blue, pattern 7)
- 176: Light/Vibration (blue, pattern 8)
- 177: Light/Vibration (blue, pattern 9)
- 178: Light/Vibration (blue, pattern 10)
- 179: Light/Vibration (blue, pattern 11)
- 17A: Light/Vibration (blue, pattern 12)
- 17B: Light/Vibration (blue, pattern 13)
- 17C: Light/Vibration (blue, pattern 14)
- 17D: Light/Vibration (blue, pattern 15)
- 17E: Light/Vibration (blue, pattern 16)
- 17F: Light/Vibration (blue, pattern 17)
- 180: Light/Vibration (blue, pattern 18)
- 181: Light/Vibration (green, pattern 1)
- 182: Light/Vibration (green, pattern 2)
- 183: Light/Vibration (green, pattern 3)
- 184: Light/Vibration (green, pattern 4)
- 185: Light/Vibration (green, pattern 5)
- 186: Light/Vibration (green, pattern 6)
- 187: Light/Vibration (green, pattern 7)
- 188: Light/Vibration (green, pattern 8)
- 189: Light/Vibration (green, pattern 9)
- 18A: Light/Vibration (green, pattern 10)
- 18B: Light/Vibration (green, pattern 11)
- 18C: Light/Vibration (green, pattern 12)
- 18D: Light/Vibration (green, pattern 13)
- 18E: Light/Vibration (green, pattern 14)
- 18F: Light/Vibration (green, pattern 15)
- 190: Light/Vibration (green, pattern 16)
- 191: Light/Vibration (green, pattern 17)
- 192: Light/Vibration (green, pattern 18)
- 193: Light/Vibration (yellow/green, pattern 1)
- 194: Light/Vibration (yellow/green, pattern 2)
- 195: Light/Vibration (yellow/green, pattern 3)
- 196: Light/Vibration (yellow/green, pattern 4)
- 197: Light/Vibration (yellow/green, pattern 5)
- 198: Light/Vibration (yellow/green, pattern 6)
- 199: Light/Vibration (yellow/green, pattern 7)
- 19A: Light/Vibration (yellow/green, pattern 8)
- 19B: Light/Vibration (yellow/green, pattern 9)
- 19C: Light/Vibration (yellow/green, pattern 10)
- 19D: Light/Vibration (yellow/green, pattern 11)
- 19E: Light/Vibration (yellow/green, pattern 12)
- 19F: Light/Vibration (yellow/green, pattern 13)
- 1A0: Light/Vibration (yellow/green, pattern 14)
- 1A1: Light/Vibration (yellow/green, pattern 15)
- 1A2: Light/Vibration (yellow/green, pattern 16)
- 1A3: Light/Vibration (yellow/green, pattern 17)
- 1A4: Light/Vibration (yellow/green, pattern 18)
- 1A5: Light/Vibration (purple, pattern 1)
- 1A6: Light/Vibration (purple, pattern 2)
- 1A7: Light/Vibration (purple, pattern 3)
- 1A8: Light/Vibration (purple, pattern 4)
- 1A9: Light/Vibration (purple, pattern 5)
- 1AA: Light/Vibration (purple, pattern 6)
- 1AB: Light/Vibration (purple, pattern 7)
- 1AC: Light/Vibration (purple, pattern 8)
- 1AD: Light/Vibration (purple, pattern 9)
- 1AE: Light/Vibration (purple, pattern 10)
- 1AF: Light/Vibration (purple, pattern 11)
- 1B0: Light/Vibration (purple, pattern 12)
- 1B1: Light/Vibration (purple, pattern 13)
- 1B2: Light/Vibration (purple, pattern 14)
- 1B3: Light/Vibration (purple, pattern 15)
- 1B4: Light/Vibration (purple, pattern 16)
- 1B5: Light/Vibration (purple, pattern 17)
- 1B6: Light/Vibration (purple, pattern 18)
- 1B7: Light/Vibration (yellow, pattern 1)
- 1B8: Light/Vibration (yellow, pattern 2)
- 1B9: Light/Vibration (yellow, pattern 3)
- 1BA: Light/Vibration (yellow, pattern 4)
- 1BB: Light/Vibration (yellow, pattern 5)
- 1BC: Light/Vibration (yellow, pattern 6)
- 1BD: Light/Vibration (yellow, pattern 7)
- 1BE: Light/Vibration (yellow, pattern 8)
- 1BF: Light/Vibration (yellow, pattern 9)
- 1C0: Light/Vibration (yellow, pattern 10)
- 1C1: Light/Vibration (yellow, pattern 11)
- 1C2: Light/Vibration (yellow, pattern 12)
- 1C3: Light/Vibration (yellow, pattern 13)
- 1C4: Light/Vibration (yellow, pattern 14)
- 1C5: Light/Vibration (yellow, pattern 15)
- 1C6: Light/Vibration (yellow, pattern 16)
- 1C7: Light/Vibration (yellow, pattern 17)
- 1C8: Light/Vibration (yellow, pattern 18)
- 1C9: Light/Vibration (white, pattern 1)
- 1CA: Light/Vibration (white, pattern 2)
- 1CB: Light/Vibration (white, pattern 3)
- 1CC: Light/Vibration (white, pattern 4)
- 1CD: Light/Vibration (white, pattern 5)
- 1CE: Light/Vibration (white, pattern 6)
- 1CF: Light/Vibration (white, pattern 7)
- 1D0: Light/Vibration (white, pattern 8)
- 1D1: Light/Vibration (white, pattern 9)
- 1D2: Light/Vibration (white, pattern 10)
- 1D3: Light/Vibration (white, pattern 11)
- 1D4: Light/Vibration (white, pattern 12)
- 1D5: Light/Vibration (white, pattern 13)
- 1D6: Light/Vibration (white, pattern 14)
- 1D7: Light/Vibration (white, pattern 15)
- 1D8: Light/Vibration (white, pattern 16)
- 1D9: Light/Vibration (white, pattern 17)
- 1DA: Light/Vibration (white, pattern 18)
- 1DB: Light/Vibration (red, medium)
- 1DC: Light/Vibration (yellow/green, medium)
- 1DD: Light/Vibration (green, medium)
- 1DE: Light/Vibration (blue, very short)
- 1DF: Light/Vibration (blue, short)
- 1E0: Light/Vibration (blue, medium)
- 1E1: Light/Vibration (green, very short)
- 1E2: Light/Vibration (green, short)
- 1E3: Light/Vibration (green, medium)
- 1E4: Light/Vibration (yellow/green, very short)
- 1E5: Light/Vibration (yellow/green, short)
- 1E6: Light/Vibration (yellow/green, medium)
- 1E7: Light/Vibration (purple, very short)
- 1E8: Light/Vibration (purple, short)
- 1E9: Light/Vibration (purple, medium)
- 1EA: Light/Vibration (yellow, very short)
- 1EB: Light/Vibration (yellow, short)
- 1EC: Light/Vibration (yellow, medium)
- 1ED: Light/Vibration (white, very short)
- 1EE: Light/Vibration (white, short)
- 1EF: Light/Vibration (white, medium)
- 1F0: Light/Vibration (red, pattern 18)
- 1F1: Light (red, indefinite)
- 1F2: Light (yellow, indefinite)
- 1F3: Light (green, indefinite)
- 1F4: Light (blue, indefinite)
- 1F5: Light (purple, indefinite)
- 1F6: Light (pattern, indefinite)
- 1F7: SFX/Light (sparkle, gray)
- 1F8: (turn off light)
- 1F9: Light/Vibration (blue, medium)
- 1FA: Light/Vibration (pale purple, medium)
- 1FB: Light/Vibration (pattern, medium)
- 1FC: (no response)
- 1FD: (no response)
- 1FE: (no response)
- 1FF: (no response)